Wednesday, November 24, 2010

Gift Ideas and Stocking-Fillers

Looking for some fabulous gift ideas and stocking-fillers this Christmas season? Look no further! We have the perfect gift ideas from as low as $1.75 each!!


Christmas Gifts Under $5


 Butterfly Wine Stopper - $4.00
Perfect for the wine-enthusiast!


Heart to Heart - Interlocking Salt/Pepper Shakers - $4.75
Gorgeous and quirky - perfect for romantic picnics!


Magnet-backed Aluminium Photo Frames - $1.75 ea.
Keep reminders of your loved ones, friends and family where you can always see them.


Christmas Gifts Under $15.00

Cupcake Wrappers - assorted colours/designs. Don't pay $16+ for these from other stores! Moonlight & Whimsy stock these starting at $13.95/pkt 12!


Christmas Gifts Under $25.00

Feather Quills - assorted colours (black, white, burgundy, teal, pink and purple!). These are a quirky, GORGEOUS gift that any writing enthusiast will love! Only $21.00 each!


 Black Quill Ink - High quality glass bottle of ink. Perfect to include with your quills! Only $15.00!


Check out all these and more at our online store:

Stock is flying out the door - so be quick!!

Save the Date! Twilight Markets.

We are pleased to announce that we will be displaying our goodies at:


Old Petrie Town Twilight Markets
Kurwongbah (just out of Petrie)

 Friday night 17th December 
5:00pm - 9:00pm


Come along and check out our brand new range of portable battery-operated LED lights, floral lights, light cubes, submersible LEDs and of course our very bright and colourful range of spherical, floating and battery operated cylindrical lanterns!


We'll also have our cupcake wrappers on display and one lucky winner will also win a $20 gift voucher to be used at our online store - just in time for Christmas!


For more information - check out the What's On in Brisbane website here and stay tuned to our blog and Facebook for updates!

Tuesday, November 23, 2010

Whimsical Wedding: Monique and Lee

Très chic. I have always wanted to use that term legitimately - and now I can! When Monique and Lee's wedding was brought to my attention, there was much sighing and squeeing. So many gorgeous details. And they are SO in love.

That dress! The colours! That BOUQUET! It's simply... irresistible! (And très chic. LOL). So without further ado, I give you...


Monique and Lee
Brisbane Powerhouse
  2 October, 2010


Lee proposed the day Monique arrived back from a month-long study trip to China. "I believe my jetlag thwarted his plans - he had planned a lovely dinner but I was too tired and refused to go. So later in the night, I woke up and he told me I had a surprise waiting at Kangaroo Point. I told him I would only go if I didn't need to do my hair or makeup!"

He proposed on the Kangaroo Point cliffs, with the city lights in the background. "Then we sat there for a while" Monique says "...and ate Jatz straight from the box and drank wine straight from the bottle." 


Monique was thrilled when Lee presented her with an emerald ring that he bought from her favourite antique store in Paddington. "I always said I'd say no if he bought me diamonds!"


A traditional wedding was never considered by the two because they felt it didn't represent who they were as a couple. 

"I also think the decision was helped by the fact that I've only been to one other wedding, and it was lovely and casual, so I didn't have any pre-concieved ideas about what makes a wedding a wedding. It was a blank canvas."


"We had 70 people there, which was by no means everyone we wanted, but was the most we could afford. To keep numbers and costs down, we didn't allow for children or plus ones."

Did they consider a wedding planner? "There were times that I would have sold my first born for a wedding planner! If planning the wedding taught me anything, it is that I don’t cope well with stress, but I am very good at hiding it. The silver lining in the big thunderous stormcloud that became my emotions is that all that stress taught me to appreciate the strength of my relationships."


Monique and Lee chose to not have favours - however they made all of the invitations and displayed small photo frames on all of the tables, with pictures of their family inside. They felt this was an appropriate way to honour those that were present and those that have passed.

They didn't make many of the decorations, but sourced all of them from sellers on Etsy, and op shops instead. "There is something very romantic about having decorations that someone has put a lot of love and time into" Monique says. "A lot of the decorations were my ideas, and I sourced some talented soul to make them - like the crocheted 'guest book' and 'wishing well' signs, and the fabric/newspaper/pinecone roses."


And the dress? "I never set foot in a bridal store, let alone tried on a 'proper' wedding dress!" Monique says.  She knew from the word go that she wanted a vintage "flapper-inspired" wedding dress - however sourcing one in a size 14 was hard. After "googling to hell and back", she stumbled upon Le Luxe Clothing - an online store that specialises in vintage reproductions.  The dress cost around $250 and it was "perfect".


"I made it a bit more 'me' with a feather cape by Tsubi (second hand from ebay) and blinged up with some on-sale pearls from el cheapo store Diva. A lot of people were apprehensive about my dress choice, and thought it would look like a costume, not a wedding dress. At times it was hard to deal with that. But ultimately I would have felt like I was wearing a costume had I been in a big poufy gown, and that's not how I wanted to feel. I wanted to feel like me - and I did."


As for the bridesmaids...err... slaves? "My three best friends Jemma, Mandy and Camille were my brideslaves." Monique says. "I threatened them with the notion of high-necked, floor-length, maroon velvet gowns!"  However in reality, putting them in matching dresses was never an option as they were all "different people with different tastes" and she wanted their dresses to reflect that.

"I wanted them to get dresses that they (genuinely) liked and could wear again. We went shopping together and didn't set out with any colours in mind - I had been thinking pastel originally - but after we found Jemma's cream and black Alannah Hill dress and fell in love with it, we decided the colours would be pale neutrals with black. We went from there" she says.


The dresses and the decor weren't the only spectacular and original parts of the wedding. Monique's bouquet was actually made by her husband-to-be. "He spent hours and hours making it after I saw one online that was way over our budget. Lots of people also gave us brooches for the project, so I felt like it contained a lot of love" she says.


Monique's favourite memory was walking down the aisle to Lee's favourite song - an surprise acoustic version of "I Was Made For Loving You" by KISS. Even though some family members were appalled at the idea of us starting the marriage with a song all about sex, she didn't care. "Knowing that I had made him so happy made me so happy in return!"


Monique's other favourite memory was the reception and the many hours spent on the dance floor. "I do love a good dance floor" she says.


Any guest feedback? "Everyone had a ball" she says. "We wanted the wedding to be like a huge party with a wedding inside, and it was. A lot of people have said that they finally 'got' the ideas I had and the vison we had for our day."

"Oh, and that I got very drunk. Very, very drunk."


 Congratulations Monique and Lee - and thank you for sharing your special day with us!


Vendors:
Venue: Brisbane Powerhouse
Dress: LeLuxe Clothing
Music:  Simon Watson and Co
Photography:
Jonas Peterson.
Cake(s):  Eileen Layt - "brideslave's" mother.

Wednesday, November 17, 2010

We *heart* Cookies!

Welcome to Part 2 of our Whimsical Tea Party recipes.

I'm kind of picky about cookies. It's hard to find the right balance between hard and soft - and then there's the matter of how sweet they should be, given that you're probably going to top them with ultra-sweet goodies anyway....etc. etc.

This is Nigella Lawson's no-fail recipe. I use it for Christmas cookies too - it's so easy to make and stays in great shape when cut.

You can see the original recipe post, courtesy of the Food Network here.

Queen of Hearts Cookies

Ingredients

Cookies:

    * 6 tablespoons soft unsalted butter
    * 1/2 cup sugar
    * 1 large egg
    * 1/2 teaspoon pure vanilla extract
    * 1 1/2 cups all-purpose flour
    * 1/2 teaspoon baking powder
    * 1/2 teaspoon salt
    *

Icing:

    * Wiltons candy melts (red).

Directions

Preheat the oven to 180 degrees C.

Cream the butter and sugar together until pale and moving towards moussiness, then beat in the egg and vanilla. In another bowl, combine the flour, baking powder, and salt. Add the dry ingredients to the butter and eggs, and mix gently but surely. If you think the finished mixture is too sticky to be rolled out, add more flour, but do so sparingly as too much will make the dough tough. Form into a fat disk, wrap in plastic wrap, and let rest in the refrigerator for at least 1 hour.

Sprinkle a suitable surface with flour, place disk of dough on it, and sprinkle a little more flour on top of that. Then roll it out to a thickness of about 1/4-inch. Cut into heart shapes, dipping the cutter into flour as you go, and place the cookies a little apart on 2 parchment or silpat lined baking sheets.

Bake for 8 to 12 minutes. When they're ready expect them to be tinged a pronounced gold around the edges; they'll be softish still in the middle, but set while they cool.

Remove the cookies with a flat, preferably flexible, spatula to a wire rack.


Melt half a packet of candy melts (as per directions for cake pops), and with the back of a teaspoon, or a clean (unused!) paintbrush, "paint" the melts onto the cooled cookies so they smoothly cover the surface. Decorate as desired, or leave as is!


Warning - these are really moreish. The kids grabbed handfuls of these as they left the party to put in their lolly bags - and I still have heaps in the fridge (despite the fact that I simply just can't just take one at a time!). Enjoy!

Tuesday, November 16, 2010

Pop! Goes my Cake.

Planning a party is one thing - planning a party AND doing catering is another kettle of fish altogether - and was definitely my biggest challenge (as well as working full time, managing a business - oh and performing in a local production of Chess!). So without further ado - here is Part 1 of our Tea Party recipe collection: Cake Pops.

(Oh and thanks to one of my favourite Hugh Grant films "Music and Lyrics" for the title inspiration!)

CAKE POPS

I've yet to find a Brisbane cake-maker that can make professional quality cake pops (Do you know of one? Let me know!) - in fact it's hard to find anyone in Brisbane who has even HEARD of cake pops, so I knew it was up to me.

Cake Pops are ridiculously easy to make but ridiculously hard to make WELL. Firstly - if you're not aware of Bakerella's blog - do yourself a favour and get acquainted with it NOW!

Here are some instructions aimed at Australian readers:

Ingredients/Resources:

1. 1 x packet Greens chocolate mud cake (I've found this the best cake to work with)
2. 3/4 can of pre-made Betty Crocker frosting (chocolate works well for me)
3. 1 1/2 - 2 packets of Wilton's Candy Melts.
4. Styrofoam block
5. Lollipop sticks (I get mine from eBay - they're so cheap!)
6. Sprinkles or other decorations.


A word on the Candy Melts - these are becoming easier to find in Australia now - Little Betsy Baker has them in practically every colour for around $10.50. Check out eBay also - various cake makers sometimes sell their leftover stock there a little cheaper. We spotted them in Spotlight the other day too - in pink, blue and choc-mint - again for $10.50.

Method:
  1. Bake your cake and leave to cool. 
  2. Break cake into halves and rub together into a bowl to form fine crumbs - there should be no lumps at all.
  3. Scoop out frosting and stir through. You might also need to use your hands (although beware - this is VERY tasty!)
  4. Roll into balls the size of chupa-chups. Any bigger and they'll fall off the stick - in my experience anyway. You SHOULD have 50 or so, depending on how many you've eaten off your hands!
  5. Place onto a tray and pop into the freezer for an hour or so.
  6. Melt candy melts in the microwave (low heat) or over a pot of simmering water. Be careful not to overheat- I've done this - it's not pleasant. Stir thoroughly to eliminate all lumps.
  7. Stir in a little oil to thin mixture out a little (there are other thinning agents you can use - but oil works for me - just not too much or you can taste it).
  8. Take a few cake balls out at a time. Dip a lollipop stick into the melted candy mixture (about an inch), and push into the centre of the ball. I tend to prep about 5 with sticks before I move onto the next step but it's up to you. 
  9. Lower the cake ball (on the stick) into the melted mixture and wriggle it around to get even coverage. Try to avoid spinning the stick - unless you want to risk it falling apart. Lift it out and stick into the Styrofoam block. You have about 5 seconds to decorate with sprinkles before it hardens!
  10. Repeat - another 49 or so times. I didn't say it wasn't time consuming!
Bakerella has the BEST decorating ideas on her blog - I am a mere pleb in the world of cake-pop making. But the ones I have made have been received very well and are super SUPER yummy!


Laura's 11th "Unbirthday" Party

My daughter Laura is the "luckiest girl in the world". Or so she keeps telling me, after her 11th birthday party, held on Sunday the 15th of November, 2010.

She is mildly obsessed with Alice in Wonderland (in every incarnation - animated and Tim Burton alike), so we decided to put on a small tea-party for her and a small group of close friends. You can bet that it was the talk of the class the next day!

I'll be doing several posts over the next few days with recipes and how-to guides - however here are the main photos of the day - with a vendor list at the bottom.

I hope you enjoy the photos as much as I enjoyed creating the event!


Invitation created with Photoshop and printed on white cardboard, w/rounded corners. 


Ribbon chandelier with a selection of blue and white lanterns waved gently in the breeze. White/covered chairs tied with blue sashes (with exception of Mad Hatter and Red Queen's chairs - tied with brown silk sashes). A mixture of scattered cushions were provided for non-padded chairs.


 Red and white feather butterflies dotted with red and white spotted mushrooms adorned the chairs.


 A splash of Laura's favourite colour accented the table. Lavender feather butterflies were hot-glued onto wires, and placed into flower arrangement with red and white spotted mushrooms.


 Lavender felt candle-holders also gave a lovely splash of colour.


 White lace trimmed with red heart ribbon, lined the table.


Photo taken during setup. 


Red "jelly shots" with blue/red heart motif on "Drink Me" labels.


 Ribbon sandwiches with blue/red heart motif on "Eat Me" labels.

 The Red Queen (played here by local Brisbane actress - Erin Grigull) sat in her rightful place at the head of the table!


A selection of "Alice in Wonderland" inspired games were played including Croquet, Mad Tea Cups, 52 Pick-up and Card Toss. The birthday girl is pictured here with the Red Queen and the Mad Hatter.


 A variety of drinks were served including Red Queen lemonade and Mad Hatter iced tea.

Red and blue themed dessert table complete with ribbon chandelier, flag bunting, cupcakes, assorted lollies, cake pops and red heart cookies!


White chocolate (and peanut butter) spiders were a hit!


 Blue cake pops and red heart cookies (neither lasted long!)


Vanilla and buttercream frosted cupcakes with red hearts for the birthday girl!


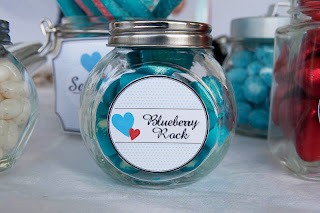
Assorted lollies in red and blue were displayed in small vintage-inspired jars.


 Guests were able to take home leftover lollies in their very own lolly bag at the end.


 The Mad Hatter (played by talented Gold Coast actor/writer Gareth Gredig), enjoying a cupcake.


The happiest 11 year old you ever did see.


Vendor List.

 
Feather Butterflies - ($7.50/pkt 5)
Spotted Mushrooms - ($7.50/pkt 10)
Lanterns -  ($2.95 - 20cm/$5.45 - 35cm)
Lavender Felt Candle Holders -  ($5.00 pkt 4)
Connecting Mini Hearts Diecut Ribbon (Red) -  ($7.95/9m)
Blue/White Cupcake Wrappers - ($13.95 pkt 12)  


Sashes
Throw cushions 
Wooden chairs (white)
Assorted teacups (floral)
Assorted vintage-inspired candy jars (clear glass)
White 2 Tier Cake Stand

Other Suppliers:

Flag Bunting: Giggleberry Creations (custom design - contact for prices)
White Paper Favour Bags: Candy Soirees (50c each)
Candy Melts (Cake Pops & Cookies): Little Betsy Baker - $10.50 (pkt)
Mini White Nonpareils (Cake Pops): Little Betsy Baker - $5.95 (pk)
Assorted Confectionery - Tom's Confectionery Warehouse  (assorted prices)
Fabric offcuts/ribbon: Spotlight